Printable Scrunchie Pattern
Printable Scrunchie Pattern - You want to avoid printing the pattern from your. Together with a diy sleep mask diy scrunchies make a great diy gift for teenagers. And there is a size chart for 7 scrunchie sizes, scroll down! Web press scrunchie tube with the seam either on the back or on one of the side folds. Pull the strip right side out. Open the pattern in your pdf reader, i recommend using adobe acrobat. You should have a long, skinny rectangular piece of fabric. Web instructions start by downloading the free pattern to your computer. You can make a classic diy scrunchie in minutes but we also have knotted/bunny ear and oversized designs, not to mention many more unique patterns. Use a safety pin to thread the elastic inside the scrunchie through the tube of fabric, holding onto the loose end.
Together with a diy sleep mask diy scrunchies make a great diy gift for teenagers. Use a safety pin to thread the elastic inside the scrunchie through the tube of fabric, holding onto the loose end. Sew a straight line across the edge. You can make a classic diy scrunchie in minutes but we also have knotted/bunny ear and oversized designs, not to mention many more unique patterns. In the print settings, make sure the scaling is set to. Remove the pins once you're done. Cut elastic according to the elastic measurements shown above. You want to avoid printing the pattern from your. Web diy scrunchie with hair tie (*new* easiest method) + pattern january 1, 2022 by sara maker today i’m showing you how to make diy scrunchies with hair ties (also known as ponytail holders). Web instructions start by downloading the free pattern to your computer.
Scroll down for the free printable patterns! Fold the scrunchie piece in half matching up the long sides. Fold fabric lengthwise so it's inside out. Web cut one rectangle from the scrunchie pattern piece, and cut two pieces from the bow pattern piece (if using). Sew a straight line across the edge. Pull the strip right side out. This tutorial includes an optional “bunny ear” bow too. Web instructions start by downloading the free pattern to your computer. Weave the safety pin through the inside of the tube, and pull it out through the opposite end. Open the pattern in your pdf reader, i recommend using adobe acrobat.

Easy DIY Scrunchie w/ FREE Printable Pattern Sewing patterns, Sewing
Fold fabric lengthwise so it's inside out. You want to avoid printing the pattern from your. And there is a size chart for 7 scrunchie sizes, scroll down! Attach a safety pin at one end. Before we can begin, get the free pattern download via the form above and print it out.

Easy DIY Scrunchie w/ FREE Printable Pattern Creative Fashion Blog
You should have a long, skinny rectangular piece of fabric. Cut elastic according to the elastic measurements shown above. You want to avoid printing the pattern from your. Next, click on print to open the print settings box. Turn the tube using a safety pin.

DIY Tutorial How to Make Your Own Scrunchies Scrunchies diy, Diy
Next, click on print to open the print settings box. In the print settings, make sure the scaling is set to. You should have a long, skinny rectangular piece of fabric. Web instructions start by downloading the free pattern to your computer. Web how to make a diy scrunchie.
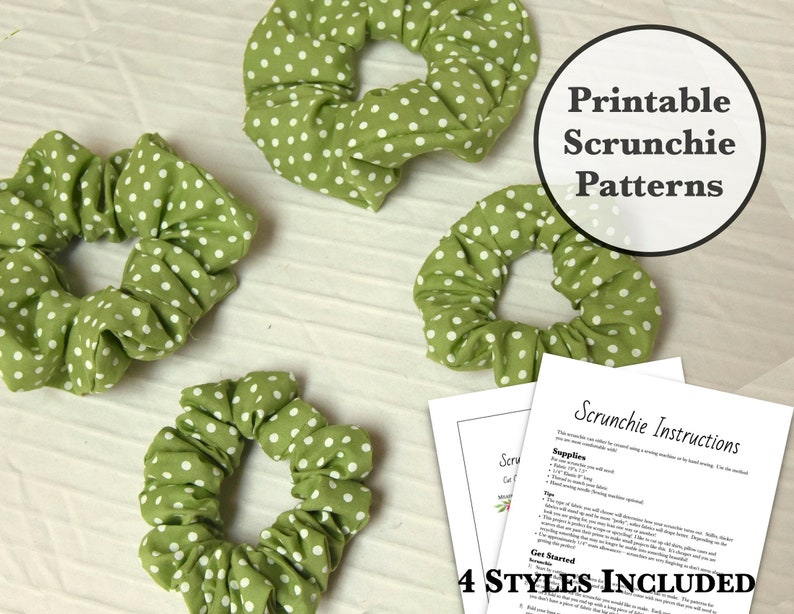
4 Printable Patterns Fluffy Scrunchie Pattern and Etsy
Use a safety pin to thread the elastic inside the scrunchie through the tube of fabric, holding onto the loose end. You want to avoid printing the pattern from your. You should have a long, skinny rectangular piece of fabric. Cut elastic according to the elastic measurements shown above. Then, find a scrap piece of silky fabric , fold it.

11 Free DIY Scrunchie Patterns Beautiful Dawn Designs
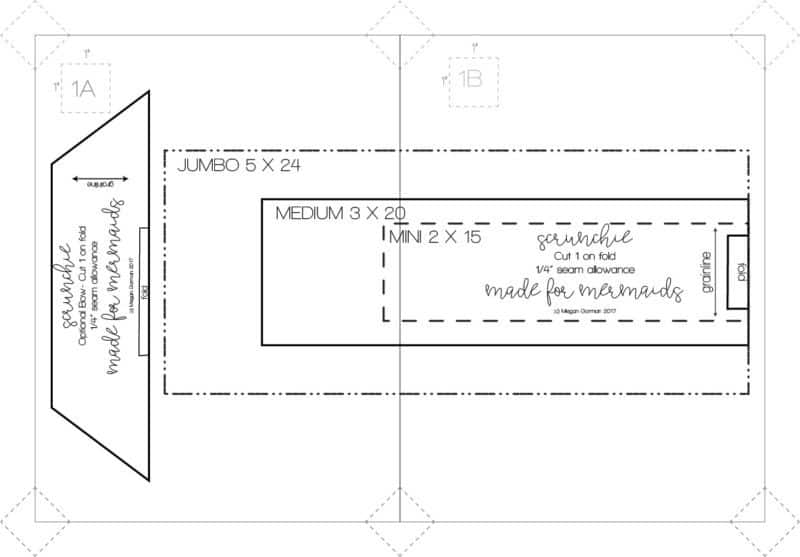
Pin and sew starting 1 inch from a short end and stopping 1 inch from the other short end. Web this collection of 17 free scrunchie patterns features all the best sewing projects we could find. Sew a straight line across the edge. Attach a safety pin at one end. Use a 1/4 inch seam allowance.

Pin on *Scrunchies*
Weave the safety pin through the inside of the tube, and pull it out through the opposite end. Open the pattern in your pdf reader, i recommend using adobe acrobat. Turn the tube using a safety pin. This tutorial includes an optional “bunny ear” bow too. Web diy scrunchie with hair tie (*new* easiest method) + pattern january 1, 2022.
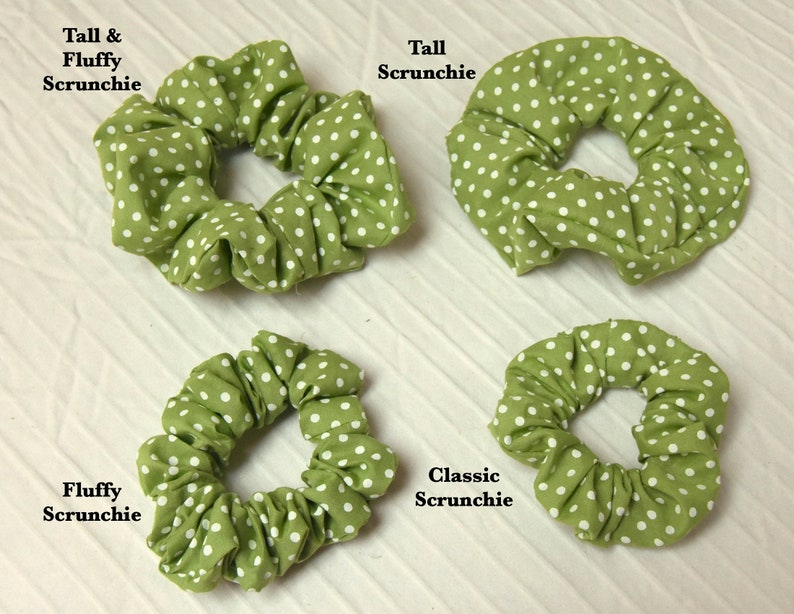
4 Printable Patterns Fluffy Scrunchie Pattern and Etsy
Web press scrunchie tube with the seam either on the back or on one of the side folds. Use a safety pin to thread the elastic inside the scrunchie through the tube of fabric, holding onto the loose end. Pin and sew starting 1 inch from a short end and stopping 1 inch from the other short end. Download my.
Scrunchies in 3 Sizes
Scroll down for the free printable patterns! Next, click on print to open the print settings box. Download my free sewing pattern here. Web press scrunchie tube with the seam either on the back or on one of the side folds. Pin and sew starting 1 inch from a short end and stopping 1 inch from the other short end.

FREE Printable Template Scrunchies with Tails (PDF Pattern) Nähen
This tutorial includes an optional “bunny ear” bow too. Use a safety pin to thread the elastic inside the scrunchie through the tube of fabric, holding onto the loose end. Fold the scrunchie piece in half matching up the long sides. You want to avoid printing the pattern from your. Next, click on print to open the print settings box.

Printable Bunny Ear Scrunchie Pattern Pattern Pieces To Make A
Use a safety pin to thread the elastic inside the scrunchie through the tube of fabric, holding onto the loose end. Web cut one rectangle from the scrunchie pattern piece, and cut two pieces from the bow pattern piece (if using). Web diy scrunchie with hair tie (*new* easiest method) + pattern january 1, 2022 by sara maker today i’m.
Scroll Down For The Free Printable Patterns!
Fold the scrunchie piece in half matching up the long sides. Web instructions start by downloading the free pattern to your computer. Remove the pins once you're done. Web diy scrunchie with hair tie (*new* easiest method) + pattern january 1, 2022 by sara maker today i’m showing you how to make diy scrunchies with hair ties (also known as ponytail holders).
Before We Can Begin, Get The Free Pattern Download Via The Form Above And Print It Out.
Web how to make a diy scrunchie. Web cut one rectangle from the scrunchie pattern piece, and cut two pieces from the bow pattern piece (if using). Open the pattern in your pdf reader, i recommend using adobe acrobat. Attach a safety pin at one end.
Then, Find A Scrap Piece Of Silky Fabric , Fold It In Half, And Cut Out Your Pattern Piece.
You can make a classic diy scrunchie in minutes but we also have knotted/bunny ear and oversized designs, not to mention many more unique patterns. Turn the tube using a safety pin. Fold fabric lengthwise so it's inside out. This tutorial includes an optional “bunny ear” bow too.
Weave The Safety Pin Through The Inside Of The Tube, And Pull It Out Through The Opposite End.
You want to avoid printing the pattern from your. Pin and sew starting 1 inch from a short end and stopping 1 inch from the other short end. You should have a long, skinny rectangular piece of fabric. Sew a straight line across the edge.